Posts

Showing posts from 2014

Date within range + Rails

Image
Here is a basic example to determine whether todays date feature within a particular range. Creating an instance method inside model, this method will return true or false def notification_required? start_date = 15.days.ago.to_date end_date = Date.today (start_date..end_date).include_with_range?(self.last_notification_sent_at) end And to use this method @user.notification_required?  
Ruby conditions + multiple ORs

Code refactoring for multiple OR conditions, Here is an example of weird looking conditional statement if name.blank? || surname.blank? || nickname.blank? || aka.blank? ... end Lets try and refactor this Option 1  if [name, surname, nickname, aka].any? { |field| field.blank? } ... end Option 2 if [name, surname, nickname, aka].any?(&:blank?) ... end

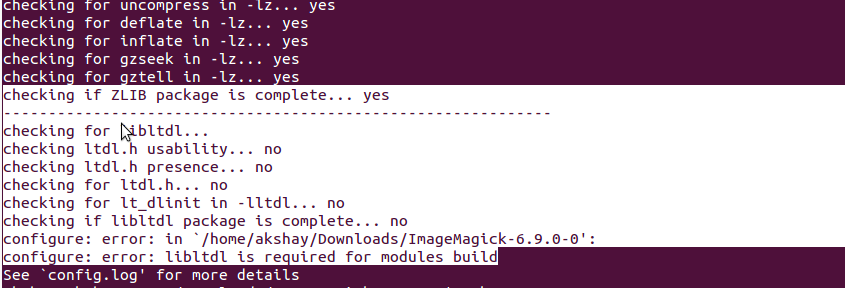
Configure error libltdl while installing imagemagick

Image
Install ImageMagick Error Solution sudo apt-get install libltdl-dev

Rails Helpers and default behavior

By Default all helpers are included in all views in Rails. So your UsersHelper methods are available in views of other controller lets say your ProductsController views. So if you wanted to change the default behavior, You need to make a small change in inside config/application.rb config.action_controller.include_all_helpers = false ApplicationHelper is still included in all views. ProductsHelper is only included in ProductsHelper views. If that controller inherits from BaseController, then BaseHelper will be included as well. And here’s is one more trick that you can use For example, We like to have a LayoutHelper that the application layout template can use: app/helpers/layout_helper.rb module LayoutHelper def layout_helper_method "Some layout logic" end end app/helpers/application_helper.rb module ApplicationHelper include LayoutHelper def global_helper_method "Some application logic" end end With include_all_helpers off, t

Define method dynamically in Rails

We are going to create two types of methods Class method and Instance method Lets take an example of class method class User < ActiveRecord::Base define_singleton_method method_name do .. end end define_singleton_method method will create class method, you can use this code in loop to create multiple methods. And you can call this method with class name and method_name so in this case User.method_name Now lets look at instance method class User < ActiveRecord::Base define_method method_name do .. end end   define_method method will create an instance method. And you can call this method with instance of class(object) and method_name so in this case User.first.method_name

Git diff and Patch file

A patch file contains a set of changes (i.e., a commit) that can be applied to any branch, in any order. You can convert git commits and differences into patch files. Those can be used to apply to a different repository or by someone else (e.g. sent via e-mail). git diff > changes.patch ">" this sign writes STDOUT to a file This basically creates a new file named "changes.patch" in your application root folder. To apply a patch file you need to use git apply changes.patch

Rails Cache on Development Environment

Set perform caching to true inside config/environments/development.rb, you need to restart the server config.action_controller.perform_caching = true   After that install memcached as a gem gem install memcached Add sudo if you are using system ruby, You can also use bundler If you are getting this error "DalliError: No server available" Then you need to install memcached sudo apt-get install memcached

Improve ruby code using Code Analyzer

Rubocop is a code analyzer gem which allows you to write code that follows the style guide dictated by the Ruby community, The gem also has lots of configuration options Let's install Rubocop gem install rubocop cd your_rails_app   rubocop This will scan all of your Ruby files in your application. rubocop app This will scan only the app directory. rubocop -o code.rb -o writes output to a file instead of STDOUT

Download PDF for Ruby on Rails Style Guide

Download Rails Style Guide Download Ruby Style Guide The PDF of https://github.com/bbatsov/rails-style-guide and https://github.com/bbatsov/ruby-style-guide

Client side validations + Dynamic forms

Few things that might be helpful when working with client side validations. I am using client side validations in rails using gem Client side validations To validate forms dynamically added to the page, we need to use the validate function manually for that form. For example: If you dynamically render the following rails template into you view: <%= form_for @model, :validate => true, :id => 'my_dynamic_form' do |f| %> <%= f.text_field :some_attribute %> <% end %> $("form#my_dynamic_form").validate(); Reset Validations $("form#my_dynamic_form").resetClientSideValidations();

Inserting and Moving elements inside Ruby Array

Here's is an array with 5 elements 2.1.2 :001 > arr = ["a", "b", "c", "d", "e"] => ["a", "b", "c", "d", "e"] Lets look at few different cases Insert a new element at starting position Using unshift 2.1.2 :002 > arr.unshift("f") => ["f", "a", "b", "c", "d", "e"] Using insert 2.1.2 :005 > arr.insert(0, "f") => ["f", "a", "b", "c", "d", "e"] In the above example 0 is the position(index) Move existing element from one position to another The element in this case is "e" Using uniq to show only unique elements 2.1.2 :009 > arr.insert(0, "e").uniq => ["e", "a", "b", "c", "d"] With uniq we are only showing unique records but the element is listed

Execute JavaScript + Capybara

There are certain cases where we need some custom JavaScript while writing some Integration test cases. For such cases you can use page.execute_script. For Example page.execute_script("$('#blog-hover-#{blog.id}').show();")

Setting the size of Browser Window + Selenium and Capybara

window = Capybara.current_session.driver.browser.manage.window window.resize_to(1200, 800) You can add this inside setup block. class CapybaraIntegrationTest < ActionDispatch::IntegrationTest # Make the Capybara DSL available in all integration tests include Capybara::DSL setup do window = Capybara.current_session.driver.browser.manage.window window.resize_to(1250, 800) end end

Committing partial changes from file in Git

git add -p file -p stands for patch mode, You can also use git add --patch file This gives the user a chance to review the difference before adding modified contents to the index.

Revert the pushed code in wrong git branch using Cherry pick

git checkout wrong_branch git revert commitsha1 # Code for wrong commit git revert commitsha2 # Code for wrong commit git checkout right_branch git cherry-pick commitsha1 # Code for wrong commit git cherry-pick commitsha2 # Code for wrong commit   If you have multiple commits and there are no commits pushed after your dirty commits, you can even use git reset to get that wrong branch to a state just before your commits and then follow that again using git cherry-pick to get your commits into the right branch. git checkout wrong_branch git reset commitsha3 #commit just before commitsha2, this will reset the whole branch to previous state git checkout right_branch git cherry-pick commitsha1 git cherry-pick commitsha2

Install phpMyAdmin with mysql on ubuntu

To install it on your ubuntu system you can use apt-get which is the easiest way. phpMyAdmin is a good option, if you don't want to install LAMPP. Please follow the below mentioned steps, these will guide you through each and every step of installation. Step 1 sudo apt-get install phpmyadmin Step 2 Select Apache2 for the server Step 3 Choose YES when asked about whether to Configure the database for phpmyadmin with dbconfig-common Step 4 Enter your MySQL password when prompted Step 5 Enter the password that you want to use to log into phpmyadmin Step 6 After the installation has completed, add phpmyadmin to the apache configuration. sudo nano /etc/apache2/apache2.conf If you are not comfortable with nano, you can use gedit sudo gedit /etc/apache2/apache2.conf Step 7 Add the phpmyadmin config to the file. Include /etc/phpmyadmin/apache.conf Step 8 Restart apache: sudo service apache2 restart

Quickest way to resolve Git Merge Conflicts

The solution which is provided below is one of the most easiest way to resolve git merge conflicts If you wanted to accept ours changes and remove theirs, run: git checkout --ours PATH/FILE If you wanted to accept theirs changes and remove ours, run: git checkout --theirs PATH/FILE If you have multiple files, you can use the following commands. grep -lr '<<<<<<<' . | xargs git checkout --ours grep -lr '<<<<<<<' . | xargs git checkout --theirs

HTML 5 + Local Storage or event.dataTransfer

Here is the most basic example to save data inside HTML5 local storage. localStorage.setItem("acomplexname", "text data to be saved"); localStorage.getItem("acomplexname"); localStorage.removeItem("acomplexname"); Local storage is a good alternative for event.dataTranfer because some browsers are restrictive and doesn't allow outside world to fetch data, a bit more detail can be found here  Bug event.dataTransfer.setData('text/plain', "data to be saved"); event.dataTransfer.getData('text/plain');

Bootstrap Modal + Remote Content + Rails way

First create a button or link that triggers the Bootstrap Modal. And In that link the "data-target " should point to Bootstrap Modal and you also need to provide an href attribute that  should point to a controller#action using routes. <!-- Button trigger modal --> <a  href = "/page_to_fetch_remote_content/" class= "btn btn-primary btn-lg" data-toggle= "modal" data-target= "#myModal" > Launch demo modal </a> <!-- Modal --> <div class= "modal fade" id= "myModal" tabindex= "-1" role= "dialog" aria-labelledby= "myModalLabel" aria-hidden= "true" > <div class= "modal-dialog" > <div class= "modal-content" > <div class= "modal-header" > <button type= "button" class= "close" data-dismiss= "modal" aria-hidden= "true" &g

JQuery + Keyup + Ajax

Here is a nice way to use "keyup" for ajax requests with a delay. That allows user to type in the whole word and using delay we can limit the number of server requests. var interval = null; $('input#input_id').on('keyup', function() { var text = this.value; clearTimeout(interval); interval = setTimeout(function() { if(text){ $.ajax({ url: "/page/", data: { q: text.trim() }, dataType: "script" }); } }, 600) });